Lose the excuses like that you need to invest lots of money because you don't have tools and materials or that you have no idea where to begin.
If you are interested in wire wrapped jewelry, you need to buy round nose pliers, flat nose pliers and flush cutters (you will spend around 15$).
If you would like experiment with polymer clay, you need even less investment. Everybody has a sharp knife at home, pasta machine is easily substituted with glass bottle, and most households have an oven.
For beading you will need only flat nose pliers which you use for crimp beads when finishing your piece.
Materials you can buy for starters are:
- Thick and thin wire (e.g. 18 ga and 26 ga) and some beads for wire jewelry
- Polymer clay in two or three colors, the cord or tiger tail, crimp beads, clasp or earring hooks
- For beading you need seed beads, the cord or thread, crimp beads and clasp or earring hooks.
Start with basics. Internet is full of sources where you can learn how certain wire behaves, find wire wrapping tutorials for beginners; instructions for working with polymer clay and patterns for beading.
Be ambitious, but realistic. If you skip the basics, it is probable that you will repeat common mistakes later, and it will be harder for you to develop your skills. It's OK to take a tutorial level or two over where you are now, but if you choose to advanced project, you will only get agitated and lose the will to continue.
Some things may seem easy to do when made by a person who has been engaged in it for a long time, but remember, we all started from scratch and coped with tools and materials at the beginning.
If you decide to work with wire, give yourself some time to get the feel for pliers and wire: how hard can you press it without leaving the marks; how to hold the pliers and wire to get the shape you wanted; how to coil the thin wire without getting it crumpled, bent or breaking it; if it breaks, how to add a new wire.
Polymer clay basics are slightly easier to learn. When playing with various patterns, and finishing your beads it is important to avoid leaving finger tips (use thin rubber gloves).
Beading requires only lots of patience.
Play! When you master the technique described in tutorial, try to apply it on other types of jewelry according to your own design.
Be persistent and don't let yourself get discouraged. After you learn the basics, it will be a lot easier to deal with challenges, and trust me when I say that there is no greater pleasure than when you give your work for a birthday present, or when you show up at work with your newest necklace and say with pride "I made it!" when colleagues start asking where have you bought it.
Tuesday 7 February 2012
Thursday 2 February 2012
Tutorial: Simple dangle earrings
I just finished another tutorial: Simple dangle earrings made with wire and czech glass beads.
I took the pictures for it more than a year ago, but because of the busy schedule, I couldn't find enough time to finish it.
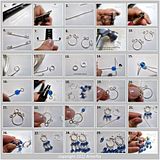
Pictures show every step from start to finish so I didn't add a description. If you have learned the basics of wire wrapping, there should be no problem with finishing the earrings. But if you have any questions, feel free to contact me.
Materials: 1 or 1.2 mm ( 18 or 16 ga) wire for central part, 0.4 mm (26 ga) wire for wrapping, head pins and beads of your choice (I used 5 mm czech glass beads).
Tools: Round nose pliers, flat nose pliers, flush cutters, hammer and stainless steel anvil.

Click on the photo for full sized image.
I took the pictures for it more than a year ago, but because of the busy schedule, I couldn't find enough time to finish it.
Pictures show every step from start to finish so I didn't add a description. If you have learned the basics of wire wrapping, there should be no problem with finishing the earrings. But if you have any questions, feel free to contact me.
Materials: 1 or 1.2 mm ( 18 or 16 ga) wire for central part, 0.4 mm (26 ga) wire for wrapping, head pins and beads of your choice (I used 5 mm czech glass beads).
Tools: Round nose pliers, flat nose pliers, flush cutters, hammer and stainless steel anvil.

Click on the photo for full sized image.
Subscribe to:
Posts (Atom)
